Salesforce and DKIM
Last month I wrote about how Salesforce was implementing the ability to sign emails sent from Salesforce CRM with DKIM. The Spring 15 update is now live as is the ability to use an existing DKIM key or allow Salesforce to create a new one for you.
Setting up DKIM within Salesforce is straightforward. A Salesforce Administrator would go to Setup->Email Administration->DKIM Keys.
You can either allow Salesforce to create you a new DKIM key or you can import an existing key. For this example, I am going to create a new DKIM key for the domain wttwexample.com with a DKIM selector of 2015Q1.
Step 1 – Creating a new key within Salesforce, you enter the Selector for the key (2015Q1), the domain for the key (wttwexample.com), and the strictness of the key allowing either the exact domain only, subdomains of the domain only, or Exact domain and subdomains.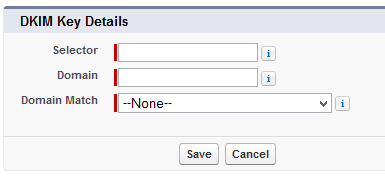
Step 2 – The next screen will display both the Public Key and the Private Key.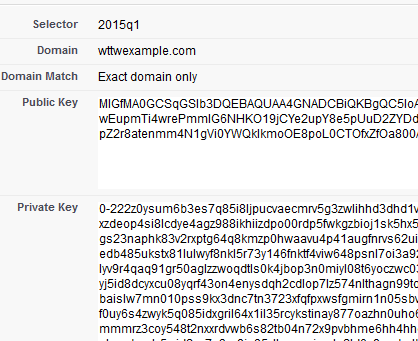
Step 3 – With the key being created, we need to store the Public Key within our DNS for the domain by created a TXT record with a hostname of 2015Q1._domainkey.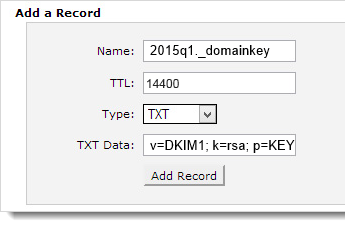
Using a DKIM check tool like ours http://tools.wordtothewise.com/authentication, we can see if the DKIM key is in the DNS and if the key is valid.
Step 4 – Once we have confirmed the key is valid and in DNS, we can go back to Salesforce and activate the key.
Step 5 – Emails sent from the Salesforce CRM Sales Cloud will now be signed with the new DKIM key and the emails will have a new header added called DKIM-Signature.
Signing with DKIM allows us to tell the recipient ISP that “yes, I sent this email” and this allows the ISP to track our reputation by the domain instead of just by the IP address. This means that some fraction of our good reputation will be associated with these emails that are sent from Salesforce CRM. If we have not established any reputation yet, signing with DKIM is a good key to enable services like feedback loops as it includes the proof that you’re sending the FBL reports to someone responsible, not a random third party.
If you have plans to consider utilizing DMARC, you need to have ALL of your sources of mail authenticated. DMARC looks for a passing SPF or DKIM validation during its evaluation of the message. Utilizing both SPF and DKIM for DMARC validation is recommended.
Having emails signed with DKIM, having a valid SPF, setting up sensible reverse DNS, having good hostnames all show that you are doing your part to send legitimate and valid mail. Signing with DKIM does not give you a free pass to send spammy emails, it just tells the receiving party who is taking responsibility for sending the message.